Week 11: Coming Together Nicely

We have so many pictures from this week that we are going to split this post up and give you an update on what has been progressing, with some before and after pictures next week to mark 3 months in to the build.

As you can tell by the past few weeks, the guys have been spending most of their time in the newly built upper floors of the house.

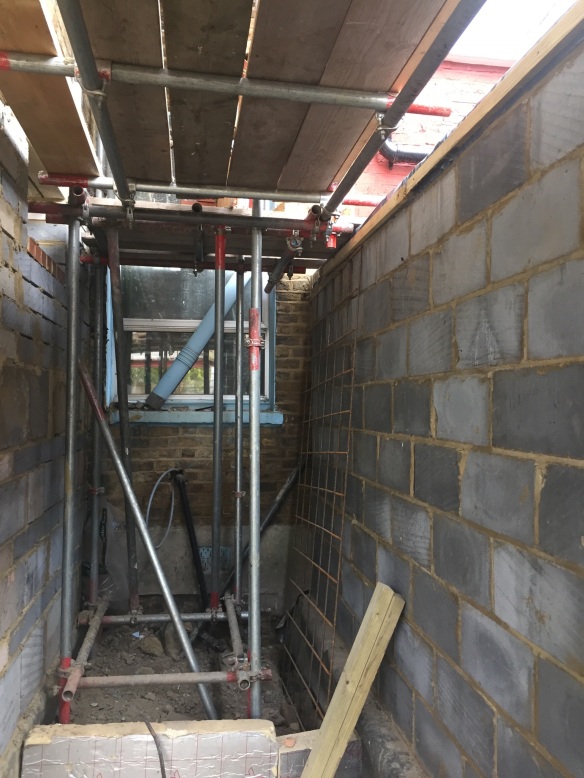
This is the rear loft room (Bedroom 4) viewed from the scaffolding. At the back you can see Bathroom 3

DSC02636

Bedroom 4 from the other side:

IMG_0423

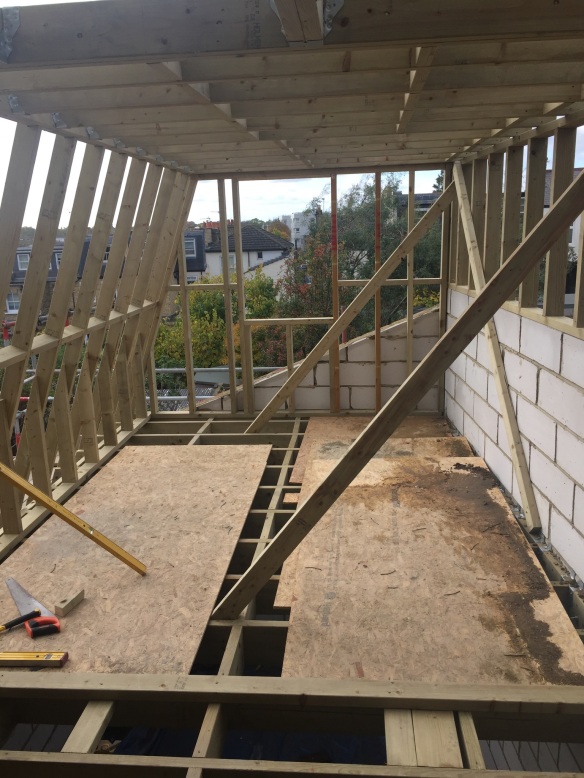
Floor of Bathroom 3. This will have a skylight instead of a window to maximise wall space:

DSC02622

This room has been built as a Mansard extension. The reason for this is to maximise our floorspace and utilise the maximum amount of square footage as we are allowed under the Building Regs permissions. If this wall was at 90 degrees from the floor, it wouldn’t be nearly as long and we wouldn’t be able to fit in this bathroom. Having an experienced structural designer has helped with getting the most out of our build.:


We’ve also got another skylight in the loft landing area. This should ensure that we get as much natural light as we can in to the middle floor landing. We think it’ll look great:

IMG_0446

The main chunk of the timber work was carried out by the chippy Paul (Yes, another Paul!) The sheer amount of food that has been cut, shaped and bolted in to place in just a couple of weeks is astounding. Couple that with the different angles and shapes that have to be exactly right for the rooms to work makes these pictures even more impressive. So here’s our personal thanks to Paul:

Paul the Chippy

Too busy to even stop to pose

Those with a keen eye would have noticed some oddly-shaped brickwork in the loft. By this I mean the triangle of brick at the back:

DSC02641

That’s the original roof line from the section of the house that was demolished. Due to the way we have gotten planning, we need to restore the rear 1st floor rooms to the same footprint and dimensions as it was, hence this room will be partially in brick from the outside. We also noticed this about the room below:

DSC02633

See on the right here the wall kinks in and the timber starts? Well that’s because this wall did exactly that as part of the original structure.

Also, how lovely do these stairs look! We’ve stuck to a traditional Victorian style staircase as it definitely is the spine of the house. One of the things we feel very strongly about is that going in to the loft shouldn’t feel like we’ve had the loft ‘done’.

Each floor should seamlessly flow in to the next. Paul B worked closely with the staircase maker to ensure that our vision was upheld, They’ve done a good job because they’ve also managed to place the stairs in the hallway a full step further back, giving us some extra much needed space in the main hall as you travel through the house:

DSC02602

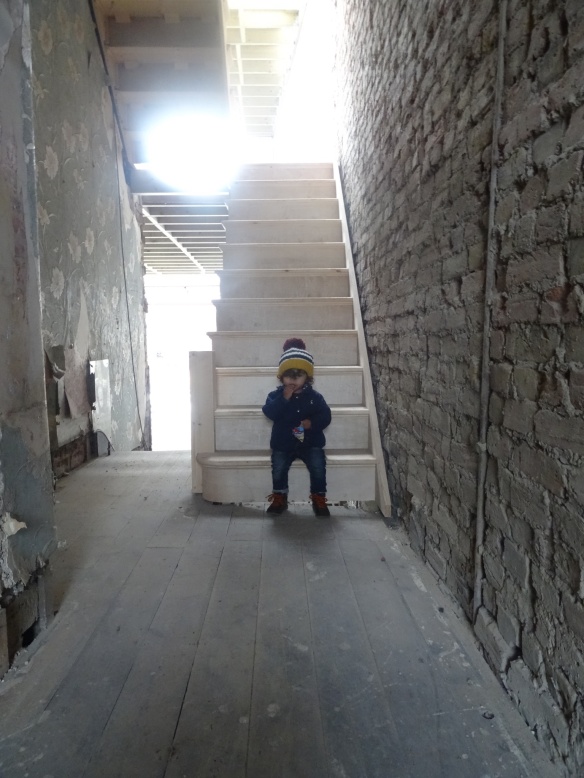
Just by Hunter’s feet you can see the outline of where the original staircase was.

We’ve also started to use Hunter as a gauge to show scale, because after weeks of getting used to the ground floor extension I felt that we had taken this space for granted a bit. Plus we look at the pictures more than getting to see it in reality and the pictures do warp how big it really is. So here are some of the ground floor with Hunter:

DSC02608

DSC02607

…and a view of the garden from the kitchen

IMG_0434


and one from the scaffolding…

DSC02625

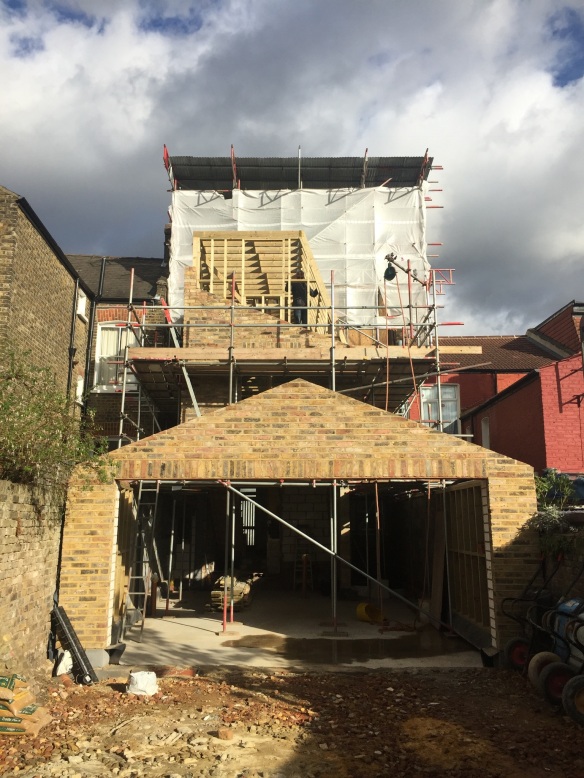
More on the garden in another post, but in the meantime here’s what the house now looks like from the back of it:

IMG_0433

Next week… we make more decisions and we will post some before and after pics.

Week 10: Another Level

The loft rooms are really REALLY shaping up! Our new staircase has been installed so we can access the loft from the first floor…

IMG_0348

The loft wall has been re-built and the roof frame, window box and walls have appeared!

IMG_0360

The rear part of the first floor has almost finished, with a ceiling partially in so we can see the space we will have for the fourth bedroom in the rear part of the loft.

IMG_0353

This will be the 4th bedroom and 3rd bathroom


If it’s all getting rather confusing for you to picture where everything is going you are not the only one! So here is my attempt at explaining the layout…

Our house is a traditional terraced property built in the Victorian era. It was originally a 3 bedroom, 2 reception room, 1 bathroom property over 4 split levels. The rear of the house is lower than the front, so essentially there will always be a half staircase on each floor. With us adding a loft this means that each of the 3 floors will be lower at the back and higher at the front – making this 6 floors…

Screen Shot 2017-10-22 at 20.32.50

That’s a lot of stairs and the next flight gets installed next week!

Week 9: The Loft Takes Shape!

After all that demolition work, we have started started to begin the task of really starting the building up the house again. Saying that, Paul realised that the roof side walls were so badly deteriorated that they needed to be taken down and re-built again, so this house continues to throw up surprises.

IMG_0339.JPG

IMG_0337.JPG

It was shockingly easy to remove these bricks!

Great progress this week as the loft structure, the ceilings for the first floor and the internal walls have all started to be built up in stud work, and we can now see the house take on its structure.

IMG_0335.JPG

IMG_0338


As you can see we were up in the loft space, so the ceiling / loft floor has been constructed and the chippy is starting to create the loft frame

Whilst we were up there we also discussed with Paul the placement of the roof light in the loft landing, and agreed on getting larger velux  windows in the bedroom area.

The rear outrigger which was taken down has started to be built up in the London Stock that we salvaged and we may get away with purchasing only a minimal amount of bricks.

IMG_0336.JPG

IMG_0342

The gable end, which is no longer glazed, has also been completed in brick work and looks good. Walking around the extension, it easier to now see how great the space will be and it will truly be a ‘tardis’ like house as the extension is so wide and long.

Other exciting news is that the new staircase that was ordered has arrived on site and will soon be going in, allowing the builders to continue the build quickly without climbing up and down ladders and give us an even better feel of how the space will flow. The original idea was that we would be refurbishing the staircase and only have a new staircase to the loft from the first floor, however the work and effort required to refurbish the staircase wasn’t a worthwhile investment and instead we have a new staircase for the entire house.

The first fix is not far off now and we need to invest some real time finalising the electrical specification, what the bathroom layouts will be and even the type of fittings so that the right pipework can be installed. This also means making decisions quickly on the other more visible parts of the build, the flooring, architraves, skirting to window furniture…Its hard to believe that we are only 9 weeks in!

Week 8: Working Our Way Up

We are finally getting to see the space we will end up with now! The concrete was poured in the extension…

IMG_0283

IMG_0281.JPG

And preparations are being made to start rebuilding the rear part of the first floor (or rear outrigger) that was demolished.

Work has also begun in the first floor to re-instate the ceiling – at the lower height – stealing some space where we can for the loft.

IMG_0292

IMG_0344

As with most builds, there are a number of things that you can’t properly figure out until the physical product is underway. With this in mind, there were a few stumbling blocks this week which we had to talk through with Paul and work through.

The first is related to the gable end in the ground floor extension that I mentioned in Week 7’s post. Due to the choices we made to maximize the space for the sliding doors, coupled with the drawing we had mis-representing the actual width of the doors, we were faced with a wider and slimmer “triangle” for the glazed part above the sliding doors. It’s one of those things that you really have to look at when the structure is physically there and make a call. Our decision was that it would look a bit silly compared to the massive glazed doors beneath, so decided to brick this part up.

IMG_0347

The second stumbling block was regarding the window that looks out from the second reception room in to the kitchen’s side extension. This used to be an external window:

IMG_6945.JPG

But now that we have rebuilt the back, it would become an internal window, looking out in to a study / play area:

IMG_0374

This little corner seems a bit weird and we did have some options for the space. First off, the wall that creates this odd ‘nook’ needs to be there. It is supporting the rooms above. So not having the wall there wasn’t an option. Some people have a door here, connecting the reception rooms to the kitchen. We didn’t want a door because; 1) there would need to be about 4 steps after the door to get to the kitchen floor level, which would take up a lot of space that we could use for storage or a desk; 2) Putting an access this side in addition to the hallway risks the rear reception room becoming a really big hallway. People end up crossing this room diagonally to get to the kitchen, which is unnecessary as we will have access to the kitchen from the hallway.

Anyway, the issue we were faced with was that now we will have the pitched side extension roof cutting across where this original window is, making it much shorter than before. It would look ok from the kitchen side but…

Picture1

From the reception room side it would look ridiculous, as there would be too much wall space above the window compared to the window size.

After discussions with both Paul the builder and Paul the Structural Engineer, we’ve now got a couple of options on how to rectify this… To Be Continued!

Looking upwards, once the 1st floor ceiling has completed the team will be starting to construct the loft!! Exciting times ahead!